| 
Behind
The Scenes An
exhaustive discussion on how this M1 garand Rifle site came to be and how I did
each step would take a whole website unto itself. What follows are just a few
of the highpoints of creating this webspace. Beginnings: This
website which was originally called simply "My M1 Garand Site" then
"The M1 Garand Rifle - An American Companion In Three Wars" and
later became known also as "Charles' M1 Newbie Page" took about
1.25 months of pretty intense effort to complete... initially.
The site has been undergoing minor revision off and on ever since. The
M1 Garand site was opened in February or March of 2000 after several months of
labor. I was not able to work on it constantly, but
I did work on it daily. The site really really
started out just as a way to show off my CMP rifles to the folks on Culver's bulletin
board. I did the original 'show off' pages and then decided that because of the
fact I could not find any decent M1 Garand assembly/stripping
procedures online that I'd share my experiences and how I did things. As I
began doing those procedures I figured that there would
be no real way to be able to do it RIGHT unless I gave them correct part names
- so I decided I'd have to create a Nomenclature section
as well. As you can figure the project snowballed... How
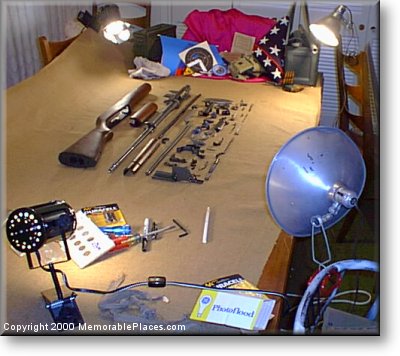
to Take a Tiny Project and Build It Into A Photographic Monster:
Now to do the above correctly, I had to photograph each and every part of the
M1 Garand Rifle. This consisted of setting up the photographic shot with different
lighting for each item, composing the shot, figuring fill flash, placing a background
item such as a patch, coin, dogtag or whatnot from the WW2 period, and determining
any number of other factors to best illustrate the
part (angles etc.). Each part was shot at least
2 times. Several parts or procedures as many as 12 times. The average was probably
3 to 5 photos of each part or procedural step. If you figure there are 57 Nomenclature
shots alone, and goodness knows how many step by step by step rifle-stripping
and assembly photos - this gets to be a really large number of photographs. Only
the best were used of course. For the Nomenclature
shots I was able to photograph them alone though I had help with lighting and
such from time to time. Two people were needed to do the photography for the stripping
and assembly sections - myself and an assistant. I set up the shots and then would
move my hands into the picture to 'do' whatever action was needed for the shot
as they took the photos I directed. Once several
shots were taken, the camera was taken back to the office and the photos were
'developed' on the computer. Many many times this resulted in going back and doing
it again.. or again and again and again.. until we got it just as close to perfect
as we could. Once a shot was accepted by me as
worthy of inclusion the real fun began. A second assistant was brought in who
helped do some of the digital photo manipulation. I did much of this as well.
This 'photo tuning' actually took longer than taking the photographs themselves
in almost all cases... At a MINIMUM we cropped all of the photos down to be the
same size then we would 'edge' them and put a shadow behind them.
Most however were not that easy. Digital photography is not an exact science and
in 2000 with the equipment that I had it was less than perfect. In fact, the largest
challenge in making this site was the photography of the smaller parts. I had
determined to use a digital camera for this as it would have been prohibitively
expensive for me to use real film and bracket the shots properly and experiment
with lighting. (Each item pictured was photographed from 3-12 times till it came
out right). Most photographs required digital
manipulation of some sort or another. This included but was not limited to dodging
or burning [lightening or darkening]) certain areas of the photographs, tilting
and turning things, even digitally removing shadows and or cropping out parts
that were attached and not messing up the background. A good example of this is
the receiver photograph. I did NOT remove the barrel on my M1 for this, instead
I used special effects and background cloning to get the affect of not having
a barrel on the receiver. Sadly digital macro
photography is still far from perfect and it took some doing to get acceptable
photos of small objects. The upside to this of
course is that I was able to get instant feedback on the photos. 'Developing'
only took me minutes and I did it myself rather than waiting for several days
days to send real film to Kodak for processing.
Once the photography and manipulation of the photos was done I built a template
for each section of the website. I then began making
the html pages that people would see. A few times
photos had to be redone or new ones added for this section. When all of this was
accomplished I'd post the page and link it back. Getting
The Words RIGHT: Another challenge in assembling
this website was learning enough to be able to coherently discuss each part of
the rifle. I wanted to note far more than most manuals would including what its
function was and where it went etc. etc. For
the nomenclature pages, I determined as best I
could what each part did and wrote it up. This information was gleaned through
field and service manuals, discussions with people on Culver's bulletin board,
and personal experience. I then posted the photo of whichever part to the template,
modified or formatted the text posted the page, and placed a link back to the
main nomenclature page. For
the sections on stripping and assembly I would
do all of the above as well as compose text on how I do it for the page. I then
got input from the late Lane Smith on anything I was unsure on. When the page
was complete I'd talk to him about it and he would proofread the new pages. Costs
And Challenges: I went through several photo-light
bulbs and spent somewhere around 100 bucks for background material, bulbs, World
War 2 artifacts, and whatnot to make the whole site cohesive and interesting.
I had not expected to spend this sum, but particularly
in the nomenclature section I believed
that it was important to add interest to the photographs so I bought items which
would help to give the photos a little life. In addition there was the matter
of lighting... During the photography I went through
several photo-flood bulbs. Why they can't make a bulb that will last more than
3 hours is beyond me and at 6 bucks a pop I was always feeling a little rushed.
I hope it does not show in the photos. In
April of 2001 The M1 Garand An American Companion
In Three Wars website was composed of 431 files.
174 of those files are actual web pages the rest are all of the photographs and
navigational images. I am constantly battling
myself for server space. As the M1 site increases in depth I get very close to
server space quota from time to time and its a compromise where other things that
I want to post do not get posted. I have recently
gotten my own domain for this site. The cost of that is 29 bucks per year plus
12 dollars in redirect fees. I also pay about 30 a month for server space. In
Conclusion... The results speak for themselves
for good or for ill. I think that the site came out okay. Someday I'd like another
digital camera that is more advanced and maybe I will redo some of the shots that
I still do not see as perfect. I must confess
part of the reason for doing this website was to force myself to become totally
familiar with the weapon. It worked. I can not yet tear it down blindfolded but
I am sure close. Soooooooooooooooooo that
is what I did.... the above is sort of the medium version of the experience of
creating a site of this nature. There were countless other little things that
were not documented here.. but you get the general idea.
It took 3 of us to put the site together and I have not a CLUE how many hours..
but it was a LOT for sure. It is an extensive site
and it is well done in my humble opinion This
has been a challenging, interesting, and fun project. I am actively looking to
improve the site so if I have made any errors, I am very interested in hearing
about them. Don't be shy! Hit the mail
button and tell me where I screwed up. You'll get a thank-you and not a flame..
promise! Thank you for visiting this website and
reading this page. I appreciate it! Feel free to tell you friends and to link
it if you have a website of your own! Thanks for
taking the time to read about this website! Please
feel free to explore the other sections of this website:
[About
This Website] [How I Maintain My M1s] [CMP Program - Our Experience]
[Our CMP M1 Garand Rifles] [CMP Ammunition] [M1 Parts Photographs & Nomenclature]
[M1 Garand Accessories] [A Little Important Humor] [Links to Other M1 Garand Sites] This page was last updated on:
June 16, 2007
Copyright 2000 - 2007 © by MemorablePlaces.com
|